Surely you didn't think you'd heard the last of phase 4: Karahana, did you? 😂 I've posted about the finishing process and the mounting and lacing process before, but I thought it was worth going over again and, for the latter process, trying to include some photos.
The finishing process was slightly different this time around. I didn't do all the steps because this project was entirely metal threads, so there was no need to enhance the shine of any silk threads. But here are the steps I did do:
- While it was still on the frame, I gently patted the front and back sides of the embroidery with my little stuffed pillow to loosen up any tiny snips of threads or dust.
- I made the wheat starch paste using about 1 tsp. of wheat starch and probably 1-2 Tbsp. of water. I heated it until it formed a thick jelly that didn't move when I tilted it in a dish.
- I took a small, stiff nail brush (like you'd remove nail polish with) and pasted down the threads on the back side of the stitching.
- I took a damp cloth and wiped any areas that looked too thick, to make sure there were no clumps of glue.
- Then I steamed the piece from underneath using a wet rag on my very hot iron (it was unplugged and empty of water during this process). I made sure to keep the iron about two inches away from the fabric and watched to see the steam rising up through the top side.
- After letting it dry for several hours, I loosened the screws, removed the nails, snipped the laced threads, and carefully removed it from the frame.
I didn't bother with finishing paper this time because that's really for silk threads. But once off the frame, it was time to mount and lace it. And I took pictures this time!
First up, I cut out a piece of foam core board that was just barely larger than the finished piece (about 1/4 inch larger on all sides):

Then I cut off half the cotton ends on the top and bottom. I took the cut-off halves and sewed them to the sides of the piece with my sewing machine:

I sewed them to the back side, just overlapping the cotton and silk by about 3/4 of an inch, and did two rows of stitching about a quarter of an inch apart:

That helps hold the cotton really securely to the silk. And then you can lace the cotton without worrying about the silk warping.
Next, I cut out a piece of quilt batting (about 1/4 inch thick) that was the same size as the foam core board and a piece of felt that was about 2 inches larger all the way around:

I used double-sided tape to stick the quilt batting to the foam core board:

Then I put the felt over the top of the quilt batting, mitered the corners of the felt, and wrapped the 2-inch edges around the back. I used double-sided tape to stick them to the back side of the foam core board:

I always do two rows of permanent tape to make sure it holds really well. With this complete, I had an ideal surface to mount my embroidery to:

The reason this works so well is that the thick metal threads or more clumpy areas of stitching can sink into the deep padding underneath the felt, but the smooth felt provides a more even layer over the top so the embroidery fabric and stitching come out looking very smooth.
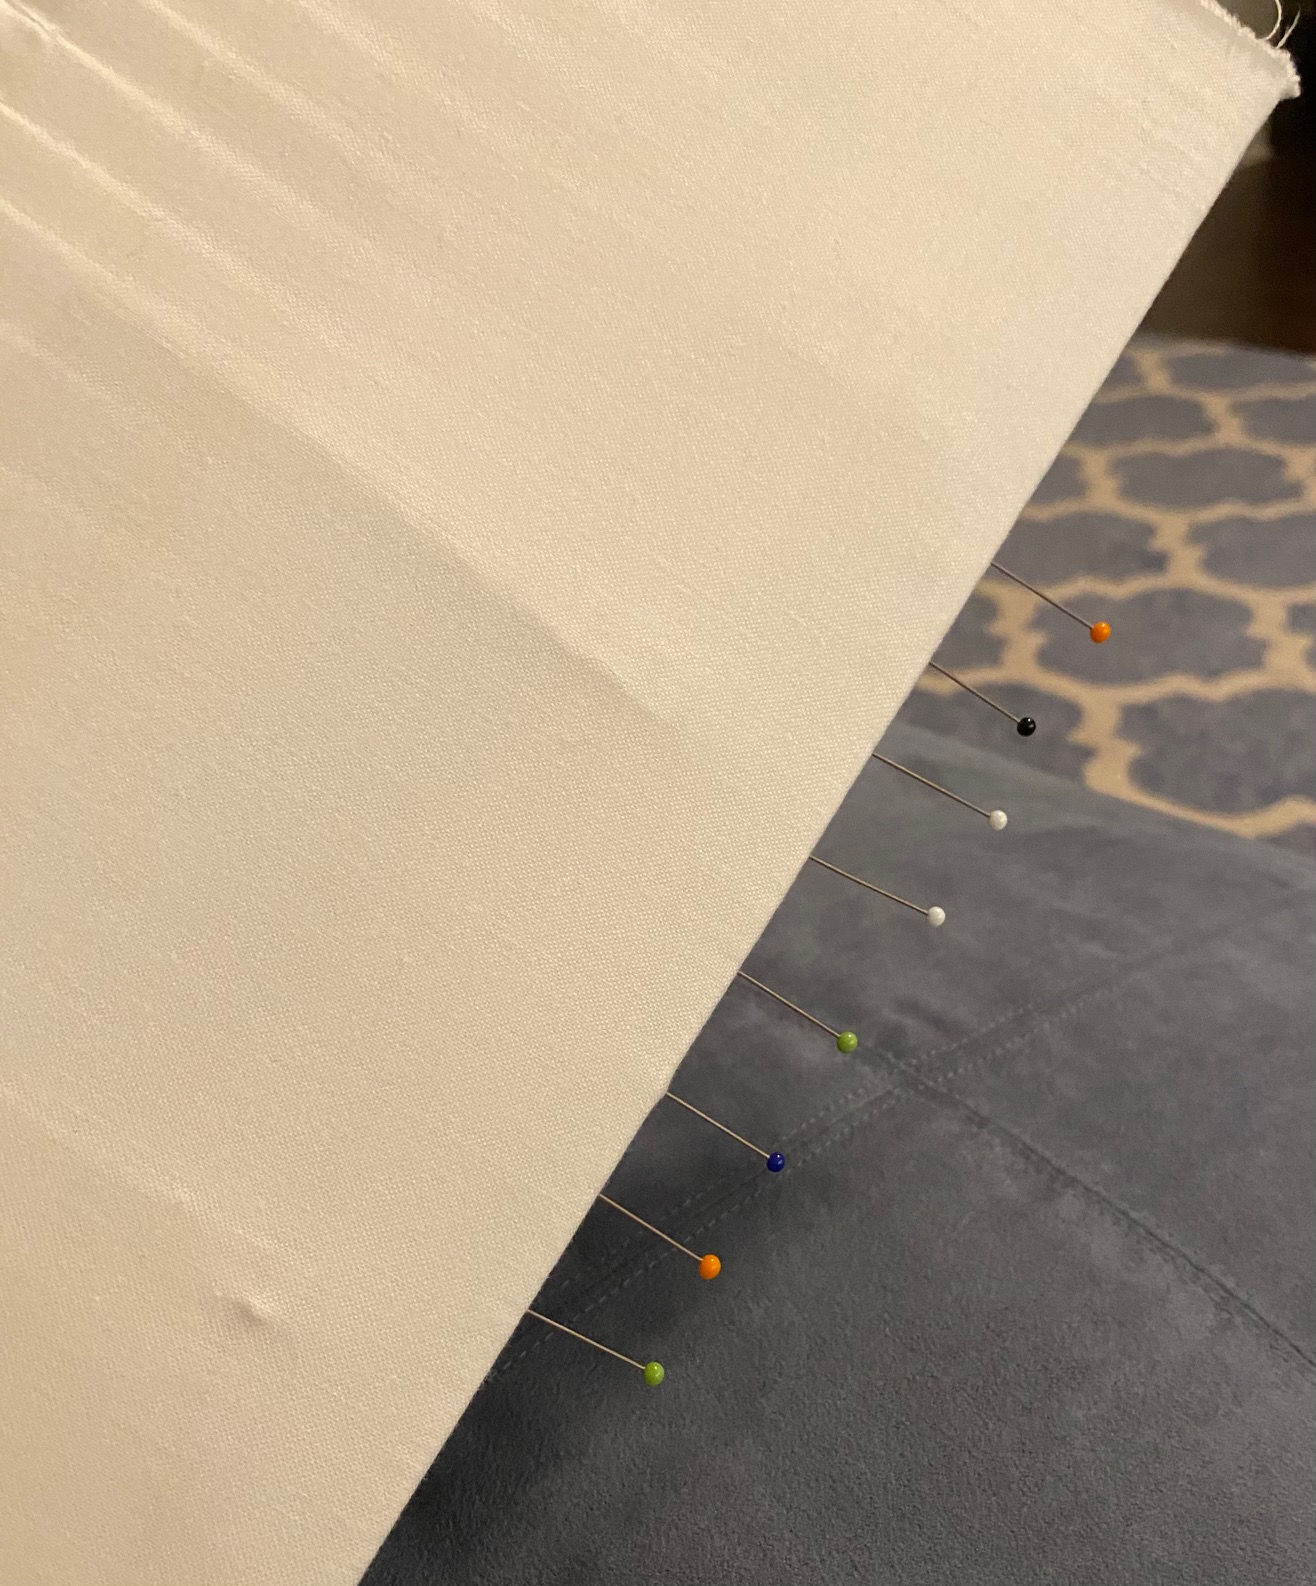
I then placed my embroidery over the top of the felt and used long, straight pins to pin it to the edges of the foam core. I just slid the needles right into the foam:

This process takes a while because I gently stretch the silk as I do it. I typically start with the pins in the middle, top and bottom, and then gradually stretch towards the edges of the top and bottom. My goal is to stretch the silk evenly so it's perfectly smooth. Then I do the same thing on the sides. If there's any puckering or warping, I adjust the pins as needed.
When I'm happy with consistency of the stretching and the smoothness of the silk and my stitching, it's time to permanently secure the piece to the foam core board by lacing the cotton ends together on the back side, like this:

I always fold the edges of the cotton under and iron them that way. Then, using really strong buttonhole thread, I lace through two layers of cotton because it provides more strength and consistency that way. I start at one end and lace the thread down to the other, leaving gaps for the second half of the thread. Then I go back, cut off an equal amount of thread as I just used and lace down through the gaps to create a shoelace effect. (It's exactly how you would lace a shoe—using half the length to go through alternate holes and then going back through the remaining holes with the other half of the thread.)
Once I've laced the entire thing, I tie a bow (again, just like a shoe). Then I go back and use both hands to slowly tighten the laces toward the bow end, lifting one set of crossed threads and then the transferring the slack to the next set with the other hand:

Just a note: be very careful during this process. If you try to pull too tight too soon, you can break the buttonhole thread. Believe me, I've done it. And oh, is it a bitter pill to swallow when that happens because you typically have to relace the whole thing since the string tends to be too short after the break.
When I get to the other end after tightening the thread, I undo the bow, remove any slack, and tie a tight new bow close to the fabric. I typically do this tightening process three to four times to make sure the lacing is nice and tight and even. If there are slight puckers in the cotton fabric and the lacing is even along the entire length, it's usually a good sign that it's tight enough to hold the embroidered piece smooth. Once I'm satisfied with the lacing, I undo the bow and tie several tight square knots to really hold the ends in place. Here's the back after both sides have been laced:

I tie my knots to one side of the fabric (in this case, the left at the bottom), rather than in the middle of the lacing. I just feel it's more secure that way. Then I snip off any excess length and tuck the ends under the fabric. With that done, I can start removing the pins:
Once laced, the fabric on the front should stay just as smooth as it was when it was pinned. If you're ever concerned, you could always remove some pins before you tie off the final knots to make sure you've laced it tight enough. If you see any puckering on the front side, you should replace the pins (making sure to stretch it smooth first) and do another round of tightening on the lacing. But I've done this so many times that at this point, I can always just tell from the lacing itself if it will be tight enough to create a smooth front.
And here is my phase 4 piece, laced and mounted and ready for framing:

I took this one into Sandy at The Attic Needlework to be framed in early January. We selected a fairly shiny silver mat and a very, very pale gold frame. I really think it sets off the embroidery nicely. I can't wait to get it back and see the final framed piece, but it will probably be a few months. Till then, I have no lack of projects to work on. 😊
Comments
Post a Comment