You probably thought I'd abandoned my Wisteria piece for good. And as it's been two and a half years since I touched it, that's a fair assumption. But I am nothing if not tenacious. 😂 So I renewed my commitment to this project and gave it another go with the help of my tutor, Mary Alice, and this time, I had a little more success.
As a reminder, here's a quick look at the overall piece and the colors I chose for it:
I ended up removing the lightest shade of purple (fourth from the right) because it looked more brown when I stitched with it. So now I'm just using the three shades of purple on the right end of the set shown above.
When I followed the instructions in the box chart (cotton padding around the edges and 2F silk over the top), the result was disastrous and didn't look anything like the picture of the finished piece they sent. After much debate and close examination of the Wisteria piece stitched by the Japanese embroidery master, we decided they hadn't used any cotton padding at all and had used 1F instead of 2F. So I gave that a try in separated layer.
The left side of the petal felt too gapped, and the right side felt too bunched up. So I tried again, this time keeping the stitches on the left side slightly closer together:
To come back around the other side of the petal, I used two grandchild stitches to get a better angle:
I think it looks so much better, less puffy and more elegant:
I did the petals on either side after that, and I think they look quite nice. I'm particularly proud of the one on the left, which I did last. I think the angle of the stitches on the skinny side of the petal turned out just perfect:
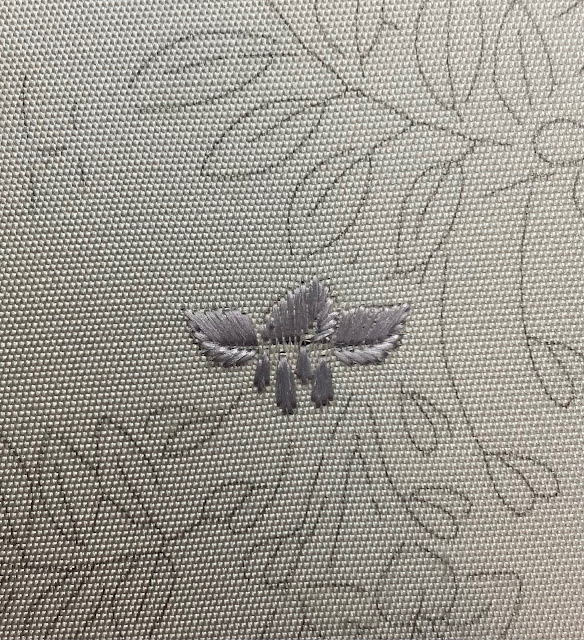
To do the little drooping petals underneath the blossom, Mary Alice suggested I stitch the edge stitches at a slight angle from the center, with one or two longer stitches in the middle to cover the tops of the edge stitches:
It's fine. It's not amazing, but honestly, these petals are so tiny that there's only room for 3-4 stitches, so achieving perfection is a little tricky. And from more than six inches away, it's hard to see any issues. Next I moved on to stitching the tiny buds that descend from the full blossom. I also used 1F of the lightest shade of lavender but this time stitched them in diagonal single layer, trying to achieve a 30° angle across each bud:
The angle of each petal is slightly different, so I basically had to start each bud from scratch, even when they were in the same group of two:
As you can see above, the angle was also different depending on which side of the bunch the bud was on. Here’s a rough sketch of how I angled the stitches and the direction I was supposed to stitch each bud in (the starting stitch for each bud is in teal, and the other stitches are in purple):
But to be perfectly honest, while I was pretty consistent about stitching in the correct direction on the foreground bud of each pair, it was often easier to get the right angle on the background bud if I stitched it in the same direction. So for most of these bud pairs, I stitched the buds from the point at the top to the base. I asked Mary Alice if this was cheating, and she said, "On petals this small? No." 😂 So I just did what worked best for each little set.Once I’d done a few pairs of buds in the lightest lavender shade, I decided to start incorporating the medium shade of plum, as it felt more natural for the smallest and tightest buds near the bottom of the bunch to be darker than the larger ones opening up toward the top:
Sometimes I did each of the bud pair in a different shade to help the transition feel more gradual:
For fun and so that you can understand exactly how teeny-tiny these buds are and why it was so tricky to stitch them, here’s a photo of them next to my pinkie finger (I do not have man hands, for what it's worth). You can see that each one is about half the size of the little white tip of my nail:
Anyway, the lower I stitched down the overall bunch, the more of the medium plum color I incorporated, even adding it to the drooping petals under a couple of the larger, opened blossoms:
Here’s another progress photo of the two colors together:
When I got to this point, I decided to add in the darkest eggplant shade of purple for the teeny-tiny buds at the very bottom tip of the wisteria bunch:
Some of these buds were only 3-4 stitches and many of the stitches were barely 1mm in length, so it was a bit of a faff. But I do think the overall effect is very pretty. And using a single strand of flat silk feels right for such tiny, delicate buds. That’s about as far as I’ve gotten. I had to take a break for a few weeks while I dealt with a health issue, but happily that’s resolved and I’m hoping to start stitching again soon. 😊 At least I can say I’m making good progress on this piece—better late than never.


Comments
Post a Comment