It’s been a while! A long while. But I’ve been so busy. Work has been ramping up, my house is now 60 days till close, I've been scouting out furniture and appliances, and I’ve started packing because I will probably have next to no time in November when things at work go really crazy. So this will probably be my last post for the year. Once I’m moved in and settled, though, I’m hoping to have time once again for embroidery and blogging.
But today, I have one final project to show you. After the last cartonnage jewelry box I made for my dad’s wife, my mom began demanding one of her own. She was very jealous. 😂
I told her I would make it for her as a Christmas present. I’m reasonably confident she doesn’t read my blog unless I remind her of its existence, but just in case …. Mom, if you’re reading this, STOP NOW! Don’t spoil your Christmas present by scrolling down any further! Back out now before it’s too late! LEAVE THE BLOG AND DON’T LOOK BACK!
Okay, that should’ve gotten rid of her. 😉 And if it didn’t, on her own head be it. So this jewelry box I made for her was my own design, and I’m really quite proud of it. It even has a secret compartment! But I’m going to make you wait till the end for that. See if you can figure out where it might be along the way. Hint: It was a fairly common way to add secret drawers to eighteenth-century caskets in Europe.
Since this box was my own design, I can show you more pictures of the steps along the way. But I forgot to take pictures early on, so my first picture, alas, is the completed drawer portion:
This is one large box with a horizontal divider held up on small ledges to allow for upper and lower drawers. The bottom drawer is one large drawer with two compartments for larger pieces of jewelry or ones that don’t bend easily, like beads or pearls:
Above it are two smaller drawers for bracelets or pendant necklaces:
Next, I started making the upper compartment for the box:
I used dividers to make six small compartments on the right side — for earrings or thin chains — while leaving a space on the left side for another purpose. More on that in a minute. Here are the six compartments completed:
I glued this entire upper compartment to the lower box containing the drawers:
Heavy books, weights, and wedged chipboard helped me make sure these got glued together solidly.
I also attached a ribbon to the side to help hold the lid up when open:
Then it was time to cover the outside of the box with fabric-covered poster board. I used masking tape and little quilting clips to make sure the edges sealed well:
Then I went back to fill in the left side of the upper compartment. This was the ring holder section. I took some foam caulk saver that was 5/8” thick and cut out a rectangle of velvet:
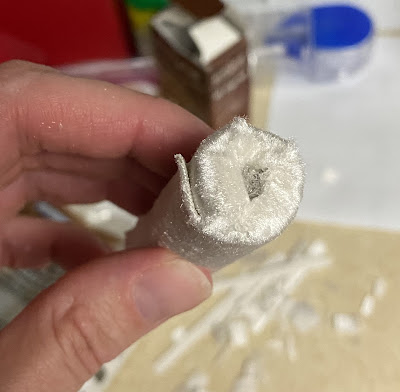
Then I rolled it up and hot glued the long edge (Elmer’s Glue All won’t work on velvet):
Then I snipped each end into a short fringe:
This made it easier to glue the ends down around the circular shape:
Again, I used hot glue for this part. And when done with both sides, I had a fully covered little cylinder, and eventually, lots of little cylinders:
I then hot glued them down onto the left side of the upper compartment:
I glued down three pieces of chipboard beneath the ring cylinders just to give this part a little more lift and make it easier to get rings in and out.
Next I made a lift-out tray with three long compartments for more pendant necklaces or bracelets. This fit on the right side of the upper compartment:
It doesn’t cover up the side for the rings, just in case my mom has some rings that stick up a little farther:
Finally it was time to make the lid pieces, including adding the hardware (the little brad legs are where I was adding metal pieces on the right side):
I attached the large top lid first. It covered the top and upper front, with a couple inches of fabric and kraft paper glued to the back to secure it in place. I had to attach the ribbon while I was gluing this piece on as well:
Next, I glued on the bottom portion, which also covered the lower front:
That two-inch flap of fabric and kraft paper at the bottom got glued to the back. Then there was a large amount of masking tape and lots more weighting things down overnight to make sure it was all securely attached:
You can see the back piece that I attached last — it went over the flaps from the upper and lower lid pieces:
For some boxes, you can do the whole lid as one long, connected piece, and I have done that before. But for this project, the fabric was directional. To make sure it was always right side up where I wanted it, I had to make the outside lid covering in three separate pieces.
This was especially important on the front of the box where I wanted the top and bottom pieces to match up exactly where they joined with the clasp:
The first time, I cut the fabric wrong and had to dash out to buy more. Luckily they still had some left at the store. But on my second try, I think I pretty much nailed it. It matches up beautifully, which I’m very proud of.
To make sure the drawers would still slide out easily when the lid was open, I added little purse feet to the base part of the lid before I attached it:
Once I took all the masking tape off, here’s what the jewelry box looked like on the inside:
Isn’t it beautiful! My mom’s bedroom is done in creams and golds and she wanted the jewelry box to match. I think I succeeded pretty well. 😊
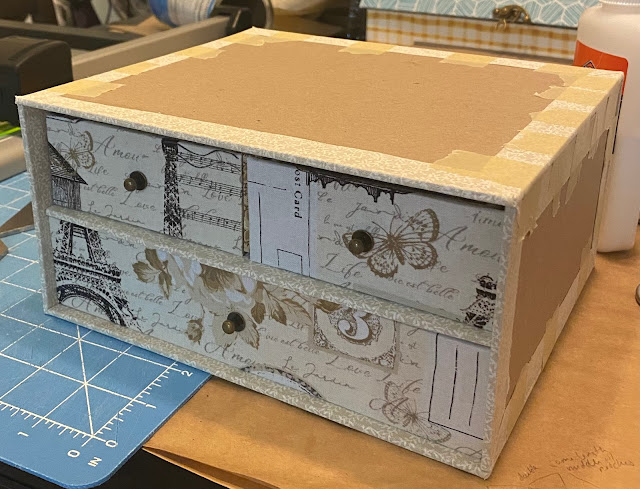
And here’s the outside all done:
I really love the delicate ivory floral fabric with the elegant Parisian design. Hopefully my mom will too. If not, I’d be happy to have this one back. 😂
So that’s the box! Did you figure out where the secret compartment was yet? Here’s another little hint:
Guessed it? Those drawers don’t go back nearly as deep as the large drawer that is below them. Here’s the secret little trick:
Yep, the divider for the small drawers is actually the handle for the secret compartment. And here it is at last:
I’m so proud of it! I think it turned out really cool. It was damn tricky to size it right and make sure everything fit together snugly, but I think it worked out really well.
And here’s one last final look at the box from another angle:
Well, that does it. It was a huge, quite complex project, but I love how it turned out. My new CARL cutter was super handy for cutting all that 100pt chipboard. I don’t think I could have done a project this large or involved with just a box cutter. Even with my huge cutter, I probably spent about 50 hours on this project.
Since I’m moving before Christmas, I wrapped it and gave it to my mom last weekend (so it doesn’t get lost in the move). But she has to wait till Christmas to open it. 😂
Anyway, that's all for now. As a quick general update, I’m still working on my Karahana Japanese embroidery phase 4 piece, but just not very often. When I have some more progress to show, I will do another post, but it will probably not be till sometime around the end of the year or early next year because I have so much going on. Until then, I hope you have a lovely holiday season. 😊


.jpeg)


.jpeg)


Comments
Post a Comment