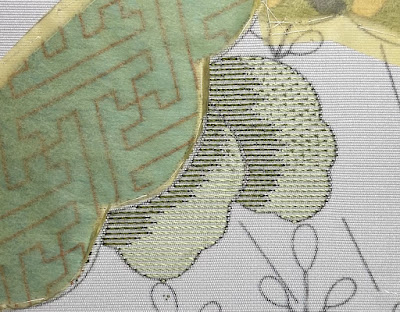
At my JE lesson last weekend, I finally learned to do fuzzy effect. I was really excited to learn this one because I think it's such a neat looking technique. On most Hiogi fans, the snowflakes are stitched in fuzzy effect. But as you may recall, I specifically requested that the snowflakes be removed from my Hiogi design, because if it's snowing, why would you need a fan? 😂
So instead, I decided to do the half-hidden paulownia leaf next to the sayagata cloud in fuzzy effect. I started by twisting 1-->1 dark green silk thread and then, using a #5 handmade needle, began stitching in every other weft valley on the outer lobe of the leaf:
I only stitched partway along the line because I was using the dark green to convey the central lobe's shadow falling on the lower lobe. And I varied my stitch length all the way down so it would feel a little more natural:
Next, I did the same thing on the central lobe to indicate the shadow of the sayagata cloud falling on the leaf:
With the dark green shadows in place, it was time to stitch the main color of the leaf in a slightly paler shade of the same hue (which I also used for the shippo foundation):
Although I stitched these on the same weft valley lines, I didn't have the two colors share a hole where they met in the center of each lobe. They're about one thread apart, so they just "kiss," as my tutor called it. After finishing the right lobe, I did the same thing to the central lobe:
I absolutely loved the look of this even at this point. It was so neat and tidy. And I really enjoyed stitching this foundation. There was just something so satisfying about it.
But to achieve fuzzy effect, you have to couch down those perfectly straight lines. You can do diagonal couching, which crosses the foundation threads at an angle and gives a fuller effect, or vertical couching, which crosses vertically and maintains a little more distinction between the lines. I used vertical couching, which is just a tiny, perpendicular stitch that comes up in the weft valley under the thread, goes across the thread, and then goes back down into the fabric under the thread in the same weft valley, often in the same hole or very close to it. (To bring the needle up and take it back down through the fabric, I had to nudge the foundation thread a little to the side because it covered the weft valley.)
I used 1-->2 twisted thread in the same light green silk that I used for the right side of the foundation stitches because I thought that would help blend the dark stitches into the light. I couched down stitches about every 3mm, in a brick pattern. Here's what it looked like when I was partway through:
You can see the difference between the top part, which is couched down, and the bottom part, which isn't yet. The couching creates a kind of fuzzy feel to the line, makes it look a little hazy, which I assume is where the name of this technique comes from. Here's what the leaf lobes looked like after I completed the couching:
I love how it looks. It's such a delicate, elegant little stitch. But this process takes a really long time — hours and hours to couch down this small partial leaf. Still, it was rather a meditative process, so I didn't mind it. And I'm really pleased with how it turned out. I can't wait till phase 8 when I get to do an entire piece in fuzzy effect. I think it will be really cool.
I still need to outline the leaf lobes because the printed pattern lines are visible. But I decided I wanted to do that in a green karayori thread, and I haven't learned to make karayori yet, so the border will have to wait till November or December. For now, it's time to cover this little leaf with quilting paper to protect it and move on to my final cloud.


Comments
Post a Comment