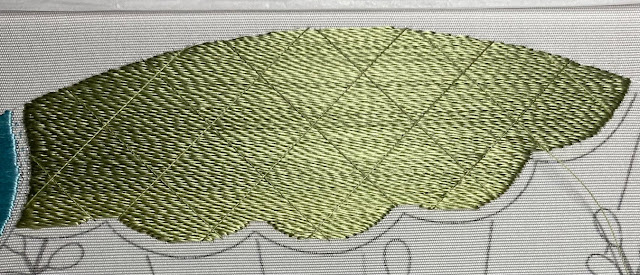
I am happy to report that I finished my shippo foundation tonight — and not a moment too soon. My JE class is tomorrow morning. The plan is to learn how to do the sayagata and shippo patterns this weekend.
I decided to do the shippo foundation in a medium sage green. Like the sayagata foundation, it is also stitched in weft foundation, but with 4->1 twisted silk instead of flat silk. So the first step was to twist lots and lots of silk threads:
Then I placed needles along a weft line to make sure I was starting off straight:
Weft line established, I threaded my needle and began stitching:
Two stitches later, I had to end my thread because, well, I'd reached the end of it. 😂 They were long stitches. Good thing I had a lot of threads prepared. I gradually worked my way over to the left side (the top of the cloud) and periodically checked my weft line to make sure I was still on track:
It took me about an hour to get to that point. I have no idea why it takes so long, but it does. And here is the halfway point, from a new angle:
I thought this was looking pretty good actually. I was pleased with how even it all was. About 4/5 of the way through the cloud, though, I ran out of my first spool of thread. So I moved on to my second spool and started making more threads:
But there was something different about these threads. Can you spot it? Maybe if you compare this photo to the first photo of twisted threads, you'll see it. I noticed it while I was twisting them — they seemed thicker somehow. But when I started stitching them, it became almost immediately apparent that they were much thicker.Unfortunately, I forgot to take a picture, but I'd only stitched about three strands (so, like six stitches), when I looked more closely at the spools to see what was off. They were definitely the same color, but my first spool had 10 sugas (filaments) in each strand, whereas the second spool had 16 sugas in each strand. Apparently, Midori changed the number of sugas in her thread a while back, and I had an old spool and a new spool.
So I had to take out the stitches I'd just put in and set aside the newly twisted threads above. My only option was to split the 16-suga thread so there were 10 sugas in each strand and then make my 4->1T threads. This was a pain to do. Thank goodness I didn't have to do too many. Once I'd twisted several more strands, I kept plugging away:
I had a little hesitation at this point because you're supposed to stich halfway into the border, but that would mean some stitches wouldn't touch the inner cloud at all — they would only be in the border. After mulling it over for a few, I just decided to pretend the halfway point of the border was the whole stitching area and stitch it as usual:
I sincerely hope this was the right call. But regardless, I think it looks pretty good. Perhaps the edges aren't flawless, but ehhh, they'll be covered up by the border anyway. 😊
I still needed to put my grid in place, though. I had the option of doing large shippos or small shippos, but after looking at a couple of photos of finished Hiogi pieces online, I decided the small shippos looked better on this piece. It will mean more stitching, but I think it will be prettier. So I created a grid with 1->2T silk in the same color, 1.4cm apart:
This lattice does act as holding threads for the foundation, but unlike the sayagata holding threads, these threads aren't temporary. They're also the guidelines for the shippo pattern and will stay in permanently.The last step was to couch down the threads between the intersections (not at the intersections because those stitches would be visible). I did two couching stitches between each intersection:
Now everything is held down and ready for me to start creating the shippo pattern over the top of it. Some of the threads are bunching up a little, particularly in the center, but I've noticed this on other people's Hiogi pieces at this stage. Eventually, when the shippo pattern is done, I'll add holding stitches to the center of these squares, which will help those threads lie flat. Mary Alice said it looked right, so I'm not too worried.
And here's everything I've done up to this point:
I really like these colors together. They're so pretty and bright and cheerful. And I think my foundations look pretty nice overall. Hopefully they'll stay looking nice once I start doing the superimposed work on them. Fingers crossed!


Comments
Post a Comment