I always have at least two projects going and sometimes as many as four or five. In addition to my Japanese embroidery project, I have finally made a start on my Jacobean piece. If you recall, I designed the following pattern for it several weeks ago (cobbled together from a bunch of different motifs I found online and some I created myself):
At first, I had planned to use the prick-and-pounce method to transfer my pattern to the fabric. But I wasn't entirely sure about some elements of this design, and I thought I might want the flexibility to change them after I got going, so I decided to do the stitch transfer method instead. I've never done it before, but it seemed straightforward enough, so I gave it a go.
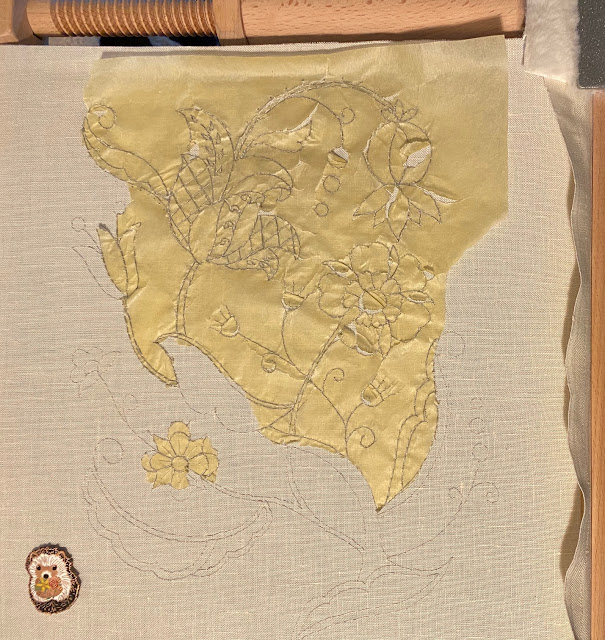
First, I traced the pattern onto some quilting paper, which is a translucent, yellowish tracing paper. It's fairly flexible but also reasonably sturdy. A new JE friend turned me on to it (thanks, Dima!). Then I placed the traced pattern onto my fabric (which was very taut on my new Millennium frame) and put a couple pins in the corners just to hold it while I got started. Using plain white cotton sewing thread, I started stitching over all the lines of the pattern. I started from the center elements and worked my way outwards (for the most part), smoothing the paper as I went:
I had done about 30-40% when I decided I'd better check and see if it was working the way I'd hoped. So I removed some of the tracing paper at the bottom over the lowest motif, and low and behold, there was an exact transfer of my pattern. It seemed to be working well, so I stitched over the rest of the pattern.
Now, I just used running stitch, but multiple new acquaintances in the world of Japanese embroidery use this technique a lot and have told me that the line of held thread technique is more effective, particularly for working on curves.
Most people have never heard of this technique, but basically, you bring the thread up at the beginning of the line you want to stitch-trace and down at the end of the line (don't tighten it or tie it off yet). And then with that same thread, you couch over the thread at whatever intervals are necessary to make it follow your design. Then you can pull the thread so it's not loose and tie it off or move onto the next line in the design.
I might try that next time, but running stitch seemed to work okay for this pattern. I made the space between each stitch fairly small so that the stitch line outlined the whole pattern with as few gaps as possible. And on tighter curves, I just used smaller stitches. Once you've stitched over all the lines in your pattern (double check that you've got them all before you remove the paper), the next step is to get rid of the tracing paper.
I ran over the stitch lines with my thumbnail initially but then used the round end of a mellore to go over them to help separate the paper from the stitch lines. I may have been too rough, as I found the stitches in some spots were a little loose after doing this. I think it probably pays to really take your time and be careful with this step. But still, it did work. And then I could start to tear away the paper:
In larger areas, the paper will just tear away easily. But in areas with smaller, more intricate designs, I had to use a pair of tweezers to tug away the little bits of paper. Eventually I got it all off and had a very accurate pattern transfer to work with:
I think it turned out really well for a first attempt, and I was quite pleased with it. But there are some definite pros and cons to the stitch transfer method.
The pros:
It is extremely accurate. It can accommodate very tiny details, and the stitch lines are never too thick the way pencil lines or carbon paper lines can sometimes end up.
Additionally, it allows a lot of flexibility. For example, I found that my stem was a little too fat in one spot while I was stitching the pattern, so I was able to easily adjust the pattern by just stitching the line in the spot I wanted it in. Even now that it's completed, if I don't like a line, I can simply snip the running stitch, remove the thread, and then do my embroidery wherever I feel like it should go.
There are no messy or permanent marks on the fabric. If I don't quite cover up a line with my embroidery, I can remove any white thread on the outside of the embroidery and there will be no sign that the pattern was ever different.
It's about the only method you can use if you're doing superimposed work, like stitching over a foundation of satin stitch. This is more common in JE, though.
- There's really only one. It takes a loooong time. It took me 10 hours to stitch the entire pattern, plus another two hours to remove the transfer paper. And frankly, I probably rushed it. It would have turned out a little better if I had been a little more patient and painstaking. That said, this is a larger design — about 8" x 10.5" — so it might be better to stick to slightly smaller designs with this transfer method.


You're very welcome :) Reading through your blog posts right now.
ReplyDelete