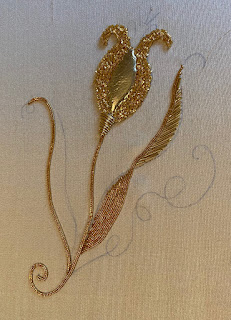
I continued working on my goldwork project the last few days. I started to work with the bright check wire first. Bright check is a hollow tube made up of thin gold wire wrapped around in a sort of triangular shape. It has lots of angles and edges, so it really reflects light well. First up was cutting the strand of bright check into itty bitty pieces:
I did this over a piece of velvety fabric to keep them from bouncing around or rolling away and used some very sharp scissors that I reserve just for cutting metal threads (everyone seems to advise this). Since the bright check strand is hollow in the center, each piece can be sewn down like a bead to the desired area, which was the next step:
I got this far and then had a mild panic attack because my little pile of bright check bits was rapidly diminishing, and I wasn't sure I had enough to do both sides of the tulip. So I stopped on the left side and started working on the right side, thinking I could start to space the pieces farther apart towards the top of both sides if it looked like I was going to run out.
But by the time I got to the same level on the right side, I was reasonably sure I would have just enough, so I finished the right side and then went back to the left, as you can see above. And I had just barely enough bright check. This was all that was left:
I had accidentally stretched this piece out a bit too much, so it wasn't even really usable. You have to be pretty careful when working with bright check and smooth and rough purl wires to not unintentionally stretch them out, which is surprisingly easy to do if they catch on anything. Once stretched, they cannot be compressed again. Believe me, I tried when it looked like I might not have enough.
Happily, the crisis did not come to pass, and I was able to finish my bright check tulip. All told, it took me a little over three hours to cut and stitch the bright check pieces into place. It felt very slow going, but I love how shiny it turned out:
Now it was time to stitch smooth purl wires over the base of the tulip. Like bright check, smooth purl is a hollow tube made of coiled wire, but it is perfectly smooth, round, and shiny. To stitch these, I laid the smooth purl wire over the area to measure it, used my laying tool to press a little indentation into the wire at the desired length, and then snipped off the piece at the indented spot. Then I brought up my needle on the left side, threaded the tube onto it, and stitched it down on the right side:
After I finished the base of the tulip, I started stitching down lines of smooth purl on the upper right leaf. Once again, I laid the wire on the fabric and marked off the correct length with my laying tool:
I was a little worried about having enough here as well, so I initially spaced them a little farther apart. But when I got to the top of the leaf, I realized I would have plenty, so I started adding extra pieces of smooth purl in between the first pieces:
I liked the look of it much more with the lines closer together. I think it really needed them. Here's what it looked like once I finished that step:
I was pretty pleased with it. I decided to go ahead and finish off that leaf by adding the border of pearl purl.
Pearl purl is also a hollow, tightly wound wire, but it's a thicker wire that is sculpted into round protrusions, so when coiled, it looks like a string of pearls. It gets couched down like Jap and passing thread. But first, you have to grasp both ends of the strand and gently stretch it so the pearls separate just a bit. That way, when you couch it down, the thread will slip between the pearls and be totally invisible. You can stretch it more if you want to add colored floss between the pearls, but I wanted it to look like a strand of pearls, so I just stretched it very slightly, only enough to accommodate the thread.
Pearl purl cannot be plunged into the fabric like Jap or passing thread, so it just has to be couched down very well at the beginning and the end. I did a few extra couching stitches on the first couple of spots and on the last few. It's a little harder to manipulate than Jap, so I really had to coax it to make that little curve at the top of the leaf:
I did a few extra stitches up there and then it went fairly smoothly down to the base. I really like the pearl purl, and it finished off that leaf beautifully:
As I had hoped, the pearl purl covered up the slight unevenness of my plunged Jap threads at the base of the leaf. This project is now probably about 70% complete. I just have to finish the left leaf, the right curlicue, and the decorative elements above and around the tulip.


Comments
Post a Comment